 |
For a curve character, the selected curve sequence gets cut out. If more than one sequence is selected, the operation will not be performed. Cutting a path will require to move either the preceding or the following curve end point, to remain with a connected sequence of curves.
The user is thus prompted to select the stationary path end point.
After cutting out the selected path,
TYPO will move the non-stationary end point to coincide with the
stationary one.
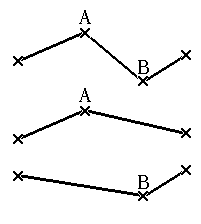
For example, take three successive straight lines, where the path to be
cut consists of the middle one.
This is demonstrated in the following figure.
|
Selecting point A to be stationary will cause the third line to begin at A, as shown in the second part of the figure, and selecting point B will cause the first line to end at B, as shown in the third part of the figure.
Similarly as for raster characters, the path cut out is kept in temporary store for later re-insertion using the Edit->Copy command. Features stored by previous Edit->Cut or Edit->Copy operations are discarded.
For raster characters, the copied pixels can be inserted into the current character. The user fixes the upper left corner of the destination by positioning. The stored pixels get inserted at that position, depending on the raster operation menu in the input pop-up window.
For curve characters, the user must have selected a point at which the cut or copied path can be inserted into the current character (unless the current character is empty, in which case insertion takes place at the focus). The new path gets displayed and an input pop-up window gets displayed. The user may now determine whether to reverse the path direction (from its end to its beginning), whether to mirror the path horizontally, or whether to mirror the path vertically, by making the appropriate choices.
For example, to create a symmetrical shape, one can create its left half, copy it away using Edit->Copy, and insert it at the end point, reversing the orientation (the second half of the path runs in the opposite direction), and mirroring the curve horizontally.
The user can choose the fill pattern from the menu in the input pop-up window. Available fill patterns are:
The command is finalized with OK or cancelled with Cancel. Note that a Paint/Fill command from outside a closed area causes the whole outside of the character to be filled.
For curve characters, we can change the paint mode for a contour or contour sequence in the current character. The sequence is that selected prior to entering the Paint/Fill. To see the character as it would appear, use the Typeset Window. The character is initially shown in the character window according to the paint mode for its font. If paint changes were already applied to the character, their effects are shown as well. Then the user chooses from the Paint mode menu, in the input pop-up window, a new paint mode for the selected contour sequence, and sets the parameters for that paint mode. Paint modes and parameters are described in the section on Painting Curve Characters. The special entry Default in the Paint mode menu resets the paint mode for the selected contour sequence to the font default. Upon clicking the left mouse button at Apply button, the changes are applied to the character, and it is shown in the Typeset window in its new appearance. The command is finalized with OK or cancelled with Cancel.
If the current character is a raster character, the current font must be a curve font. The user is then presented with a slider in an input pop-up window to choose the scale factor for scan-conversion (initially 1). The slider shows the range [0.01,5], with increments of 0.01 (0.0001 when choosing Fine). While determining the scale factor, each time the left mouse button is released or an arrow is hit, the result is pre-shown. Pressing SHIFT-CONTROL-Left mouse button resets the scale factor to 1. After the conversion is completed (with the middle mouse button), often the Edit->Paint/Fill command will be used to fill the converted outline with some pattern or black.
A whole curve font can be converted to a raster font on storing the font. This is described in the section on Converting Fonts.
To convert a raster character into an outline character, the outlines of a black raster area with are traced with curve paths (i.e. curve paths are fit to the raster area outline). The user is presented with a slider in an input pop-up window to choose the scale factor for scan-conversion (initially 1). The slider shows the range [0.01,5], with increments of 0.01 (0.0001 when choosing Fine). While determining the scale factor, each time the left mouse button is released or an arrow is hit, the result is pre-shown. Pressing SHIFT-CONTROL-Left mouse button resets the scale factor to 1.
A black area may have one or more outlines. The digit '1', for instance, has no holes and thus only one outline. The digit '0' has one hole and thus two outlines, one on the inside and one on the outside. Similarly, the digit '8' has three outlines.
A curve path is fit to each outline of the character, governed by the settings in the input pop-up window. These curve paths are appended to the current character. If the OK button is depressed, the result gets fixed. Otherwise, the settings can be changed and retracing occurs whenever Apply is pressed.
A whole raster font can be converted to a curve font upon storing the font. This is described in the section on Converting Fonts.
Note that outline fitting involves the fitting of mathematically precise curves to a discrete raster image. This process can, by its nature, not be absolutely precise. Manual corrections are often necessary after the conversion operation, in particular if the original raster characters are not large enough. The Adjust commands perform such corrections.
The following settings appear in the input pop-up window when the Show Options button is pressed (they disappear after the Hide Options button is pressed):
Recommended values for outline tracing of scanned font art at large sizes are Maximal tolerance=3, Average tolerance=1. For raster art which is already in high quality, such as high resolution raster fonts, the defaults of 1 and 0.5 are usually adequate.
The minimal distance between corners is also influenced by this value. Corners must always be at least five pixels apart. In addition, if the Minimal curve length is above 5 and below 10, then this will also be the minimal distance between corners. If the Minimal curve length is above 10, then 10 is used as the minimal corner distance.
For any kind of insertion, the user is presented with an input pop-up window that contains the insert position X and Y, Horizontal Scale, Vertical Scale, and Angle.
To insert text into a raster character, the input pop-up window contains also the raster pixel operation menu. If Copy is chosen, the text is inserted as is, ignoring the original contents of the current character below the text. For Or, the text is put on top transparently, i.e. black pixels of the original character are preserved. For Xor, whenever a black pixel gets put on top of a pixel in the original character, that pixel reverses its color, otherwise it stays the same. For And, the only black pixels are those which are black both in the kept rectangle and in the original character. This is, for instance, useful if the text is to be clipped against a shape, as described for Edit->Paste.
Moving, scaling, changing the raster operation can be done repeatedly, pressing the Apply button to make the changes effective. The result is fixed by depressing the OK button and cancelled by pressing Cancel.
When inserting raster text into a curve character, the Show Options button shows the same options as for the Edit->Raster<->Curve command.
A pop-up input window is shown. There, the user can choose the scale factor on a slider. The characters are aligned either at their base points or at their midpoints such that their slopes are the same as that of the path at the corresponding point where the characters are put.
To insert raster characters, the same conversion options as in Edit->Raster<->Curve are shown in addition when the Show Options button is hit.