 |
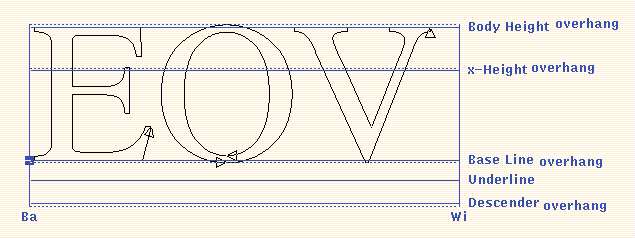
The letter 'E', for instance, is typically straight at its top and
its bottom. It begins then exactly at the base line and
ends exactly at the cap height.
The letter 'O', on the other hand, is rounded at its bottom or top.
Making it begin exactly at the base line, like the letter 'E',
will cause the impression that the letter 'O' base is higher than the
base of 'E'.
An optical correction is needed to overcome this visual impression.
The letter 'O' must thus begin below the base line,
and, for the same reason, end above the cap height.
The letter 'O' is said to have a base and a cap height overhang.
Each horizontal guide line has thus a corresponding overhang zone.
This overhang zone will contain the overhangs of all the characters
in the font for this guide line.
An example is shown below.
|
Note that, usually, the base line overhang zone will be situated below the base line, and the cap height overhang zone will be situated above the cap height.
Similarly to common heights, certain bearings are common to characters in a font, such as the left offset of a typical character from the base point. Note that there are no overhang zones for vertical guide lines.
TYPO provides the possibility to define, for each font, up to ten horizontal and up to ten vertical guide lines. The horizontal guide lines are always relative to the base point. The vertical guide lines can be chosen relative to the base point or relative to the base point of the next character (base point+width). Vertical guide lines of the second kind can, for example, be used to specify the typical right bearing in the font. The vertical guide lines can also be slanted by an angle between -45 and 45 degrees. This is, for instance, useful for the design of Italic characters.
A guide line can either be nameless, purely to assist the font designer, or it can represent a width or height meaningful to the TYPO system. The following table gives an overview of the heights and widths known to TYPO (heights are measured from the base line upward and depths from the base line downward).
Guide line visibility is determined by the user with the File->Options command.
Note that the guide lines, being common to all the characters in a font, are font properties and not character properties. Creating or modifying guide lines will thus make a change to the font but not to the current character.
 The Guide Line Tool
Note that a current character must be loaded, and it must belong to the current font.
Typically, the left bearing (the distance of the left end of characters from their base point) is described with a vertical line relative to the base point, whereas the right bearing (the distance of the right end of characters to the base point of the following character) is described with a vertical line relative to (base point+width). Throughout the guide line commands, each vertical guide line is shown with an an arrow indicating whether this guide line is relative to the base point or to (base point+width).
To modify a guide line, drag it as required. Note that base lines and width lines cannot be dragged, as this would create a new guide line instead. To change their values, use the Transform->Shift command and the various Metrics commands.
Guide lines may be deleted by dragging them into the line from which they were originally dragged out of at their creation, i.e., the base line for horizontal guide lines, and the vertical base line or width line for vertical guide lines.
 The Guide Overhang Tool
Initially, each overhang zone is of size zero, i.e. it does not extend beyond its guide line. To define a nonzero overhang, drag it out of its guide line.
To change an overhang, drag it as required.
An overhang zone gets deleted if it is made coincident with (dragged into) its guide line.