The behavior of TYPO is governed by a number of user-settable options.
Options are set with the File->Options command.
The Options Window is popped up (see the next figure).
The Options Window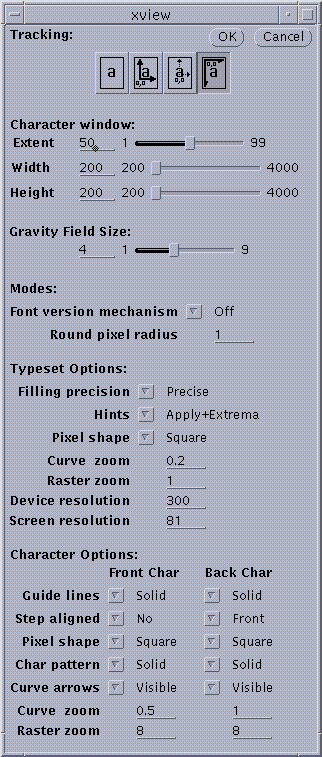 |
The command is completed by clicking the left mouse button over the
OK button.
Clicking the left mouse button over the Abort button restores
all the option settings to their values at the time that the command
was entered.
When set to the satisfaction of the user, these options can be saved
either globally in the user"s home directory
or locally in the current directory.
Option settings saved in the current directory are preset accordingly if
TYPO is started from within that directory.
Option settings saved in the user"s home directory are used otherwise.
The commands used to save options are
File->Save Options/Keys->Globally and
File->Save Options/Keys->Locally.
Options are saved either in the user"s home directory
if Globally is chosen,
or in the current directory if Locally is chosen.
These commands cause a file named .typodefs
to be written in the required directory.
The Tracking menu disables/enables
the display of relevant coordinates and angles
in the tracking information window
during editing.
The menu contains four possible choices:
- No tracking
- Track with the base point as origin (y axis upward)
-
Track with the user-defined focus as origin (y axis upward)
-
Track with the upper left corner as origin (y axis downward)
Angles are always measured counter-clockwise.
For instance, when a curve point is picked up with the
Shift Point Tool,
the displayed tracking information will consist of
the coordinates, the incoming angle and the outgoing angle, both at
the present time and at the time the command was entered.
Note that the coordinates in the
Character Properties Window
always use the upper left corner as the origin.
The Character Window Relative Width slider
controls the distribution of the area to the right of the
control panel
between the Character and Typeset windows.
The value displayed on the slider is the fraction of the total area
to be occupied by the character window.
Note that changes to this value are ignored if a character or
background character has been loaded.
The Raster Character Minimum Width/Height sliders control the minimal
width and height of the current raster character as follows.
Usually the width and height of the current
raster character matrix are taken
to be the size of the character window at the time the character
is loaded or created.
If the Raster Character Minimum Width or Height
value is larger than the Character Window width or height,
that value is used instead. This allows loading/creating raster characters of
sizes up to 4000 by 4000 pixels. Note, however, that working
with large characters gets rather slow if not enough physical memory is
available on the work station on which TYPO is run.
Note that changes to these values are ignored if any character
has been loaded.
The Gravity Field Size slider determines the
gravity field size in the range [1,9].
Whenever an object such as a point or a curve is selected,
the gravity field size
defines the maximum distance of the mouse to that object that is
still recognized as being above.
The size of all markings, including the curve character base point
and the curve point markers varies with the gravity field size.
The Font Version Mechanism allows the user to preserve font file versions,
and will cause fonts which have changed to be written out under new names.
As explained for File->Save, if the mechanism is enabled,
saving the file filename
will write the file filename_1,
and saving the file filename_n
will write filename_(n+1).
If the font version mechanism is used properly, an original font cannot be
overwritten.
The option Layout Glyph Filling affects the
File->Font Edit->Layout Font
command.
If set to Outlines, the glyphs are shown by their outlines.
If set to As in font (default), the glyphs are painted as indicated in
the font.
The Curve Drawing option determines whether the curves
in the current character in the character window are drawn Fast
or Precise (default: Precise).
Bézier curves drawn with the Fast option may be
displayed with aliasing errors, resulting in off-by-one errors at some
points in the curve.
Arcs may pass by their end points at one-pixel distances.
These errors are eliminated with the Precise
option, which takes about 30% to 40% more drawing time.
Note that Typesetting and curve-to-raster conversion
(Edit->Raster<->Curve) and
Edit->Insert Text) are always done Precisely.
The user has the possibility of displaying the current or background character
(raster only), as well as the typeset text, with square or with round pixels.
For square pixels, the pixel width and height are
always equal to the pixel distance.
For round pixels, however, the radius may be set with the
Round Pixel Radius option, relative to the pixel distance.
The value 1 indicates,
for instance, that each pixel overlaps its four neighbors up to their centers.
(The pixel shape, square or round, is set with the
Char Pixel Shape and
Typeset Pixel Shape options,
as described for the File->Options command).
The Guide Lines Visibility option governs the way
guide lines are displayed:
- Guide lines are Off, i.e., invisible
- Guide line Crossings only are shown (as bulls-eyes)
- Guide lines are shown Dotted
- Guide lines are shown dotted, Continued to infinity
- Guide lines are shown Solid
The Guide Lines Visibility option is separately set for
the current and the background characters.
Three guide lines are always present for each character:
- A horizontal line through the base point
- A vertical line through the base point
- a vertical line through (base point+width)
If Step Aligned is enabled, the Character->Step and
Character->Browse commands
will place the next character
in a way that the base point position is preserved.
The Step Aligned option is separately set for the current and the
background character.
For the background character, this option may also be set to Main.
In that case, the background character is placed such that
its base point coincides with that of the current character.
Pixel shape determines whether raster character pixels are displayed
as squares (default) or as circles (actually
as rectangles or as ellipses,
if the horizontal and vertical raster zoom factors differ).
The radius of a round pixel equal to the pixel distance, i.e. each circle
touches the center of the next one.
The Pixel Shape option is separately set
for the current and the background character.
This option is effective only if a large enough raster zoom factor is
specified where the round pixels can be represented at all.
Char Pattern determines whether raster characters
and curve character outlines
are to be displayed solid or (simulated) grey
(raster characters striped and curve character outlines dotted).
For instance, when tracing a raster background character
with a curve outline, it is
reasonable to use solid pixels in the background character and a solid
outline for the main character.
Default: Solid for the main character and grey for the background character.
The Char Pattern
option is separately set for the current and the background character.
Note that the color can be set independently of the character pattern
with the Window->Colors command.
The Curve Zoom option is an alternative to the
Window->Zoom command for curve characters,
and allows changing the zoom factor for curve characters.
This option exists so that the user can define
a different initial value (instead of the system-supplied default).
The Raster Zoom option is an alternative to the
Window->Zoom command,
and allows changing the zoom factor for raster characters.
This option exists so that the user can define
a different initial value (instead of the system-supplied default).
Typeset Curve Character Filling Precision determines the
precision with which filling is performed.
Precise causes each pixel to be decomposed into 4 by 4 sub-pixels,
whereas Fast works on a pixel basis.
Very Precise uses 16 by 16 sub-pixels;
the result is very good, but filling is not very fast.
Typeset Curve Character Hints determines whether hints
are to be applied.
Ignore causes all hints to be ignored.
Apply causes hints to be applied, and Apply+Extrema
causes also implicit hints to be applied
(see Hint Commands).
Typeset Pixel Shape
determines whether typeset pixels are displayed Square or Round
(or rectangular and elliptical if the horizontal and
vertical raster zoom factors are not the same).
This option is effective only if a large enough raster zoom factor is
specified where the round pixels can be represented at all.
The Curve Zoom option is an alternative to the
Typeset->Zoom Curves command and allows changing the
curve zoom factor for
curve characters in the Typeset Window.
This option allows the user to set a different initial value
(instead of the default 0.2).
The Raster Zoom option is an alternative to the
Typeset->Zoom Raster command and allows changing the pixel
magnification factor in the Typeset Window.
This options allows the user to set a different initial value
(instead of the default 1).
Typeset Device Resolution is the resolution of the intended
output device (i.e. number of pixels per inch).
This value is used to compute the point size in the
Typeset Properties Window
(Default 300).
Typeset Screen Resolution is the resolution of the screen
(i.e. number of pixels per inch).
This value is used to compute the point size in the
Typeset Properties Window (Default 81).
Menu commands can be assigned to function keys.
This enables the user to hit a single key for frequently used commands
rather than move to a command menu header, pop up the menu, and choosing
from it.
The user-definable keys are:
F1 through F12, Stop, Again,
Props, Undo, Copy,
Paste, Find, and Cut.
The File->Keys command displays the Key Definition pop-up
window in which the key definitions are described (see the following figure).
The Key Definition Window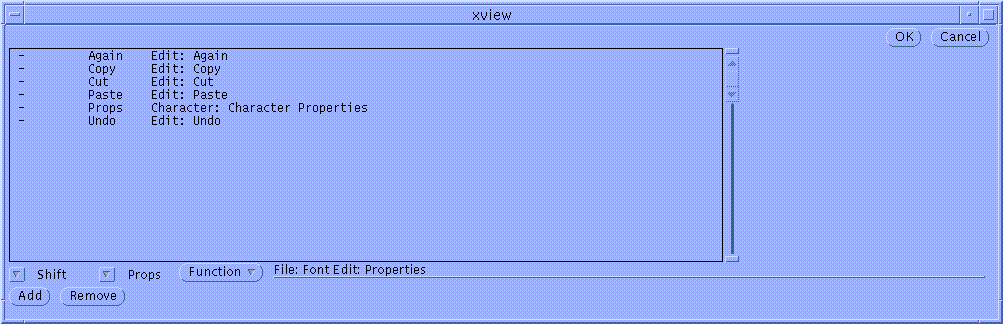 |
The command is either aborted by clicking the left mouse button at
the Abort button in the first row
(no new changes are kept), or completed by clicking
the left mouse button at the OK button (changes become effective).
The window contains a scrollable display area where the already
defined keys are shown.
This is followed by three menus:
- The leftmost menu chooses the key modifier
(none, SHIFT, CONTROL, ALT, META).
- The middle menu chooses the key to be defined.
- The rightmost menu selects the command to be associated with the key.
To assign a command to a key, say assign the Edit->Undo command
to the Undo key,
proceed as follows:
- Choose the empty entry in the leftmost menu (no modifier).
- Choose the Undo key from the middle menu.
- Choose Edit: Undo from the Function menu.
- Press the Add button.
To remove a key definition, choose the key modifier and the key for
which the definition is to be removed in the leftmost and the middle menu.
Then press the Remove button.
Together with the current options setting, the current key definitions
can be saved for later re-use with the
File->Save Options/Keys->Globally or the
File->Save Options/Keys->Locally commands,
either globally or locally.
Options and key definitions are saved in the file .typodefs,
either globally in the user"s home directory or locally in the current
directory.
TYPO reads these files at startup time.
When TYPO is started, it looks first whether options and key definitions
were saved in the current directory. If none were saved there,
TYPO checks whether options and key definitions
were saved in the user"s home directory.
The corresponding option settings and key definitions are then reinstated.
The default key assignments are shown in the following table.
For function keys with meanings in OpenWindows,
those keys will retain their original meanings, as described in
the appropriate manuals.
For example, Front will, for right-handers,
alternatingly expose/hide the TYPO frame,
and Open will open/close that frame.